


As any web developer can attest, formatting user uploaded images is a regular task with almost every project. Some of the most common challenges are formatting an image, whether it be tall or wide, to become a square or squarish image. The trouble is, when it comes to photographs of people, how can you setup an automated way to format these pics to a standard size without cutting people's heads off?! The trick is find a common focus and crop that works for both types of images.
What tools are out there to help? Fortunately, quite a few (ImageCache Actions, Auto image style, ImageField Focus, Smart Crop just to name a few) and this article will focus on using just one module to achieve the maximum results for the end user with minimal fuss. Our goal here is to make life easy for someone perhaps managing the site whom doesn't have access or know-how to post-process a photo. They want to upload either a wide or tall photo and have it 'automagically' processed to show the people in it.
For this tutorial, we're going to be using the excellent ImageCache Actions module to make a final image which is 280px wide by 240px tall but you can change the dimensions as your needs dictate. The premise is to zoom into a photo, move the focus up and then crop it. To accomplish that, we're going to set up three image styles: one to deal with wide photos, another to deal with tall photos, and a third whose job is to choose the appropriate one for the image that's been uploaded.
Step A: For Horizontal / Landscape Images
- Enable the submodule, Imagecache Canvas Actions which will also activate the main Imagecache Actions module
- Go to /admin/config/media/image-styles, create a new style called 'landscape to preview 280x240' (or whatever suits).
- For the first action, select 'scale' from your image style action and set only the height to 260px (leave out the units).
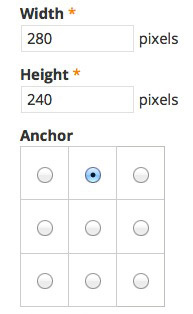
- For the next action, select 'Crop' and set the width to 280 and the height to 240. (Cropping it to a slightly shorter height ensures we cut out white borders which may be present on the image.) Also, set the anchor to the top middle section (see figure). This creates a focus on the upper half of the image while maintaining the center sections, essentially giving us the top 3/4 of the image.
- We're done with this style for now.
Step B: For Vertical / Portrait Images
 Create a new style called 'portrait to preview 280x240'.
- For the first action, select 'scale' from your image style action and set only the width this time to 300px (leave out the units).
- For the next action, select 'Crop' and again set the width to 280 and the height to 240 and the anchor to the top middle. (Note when you save this action that the preview image appears to cut off the bottom but keep in mind, the system is using wide image to show the effect you just made, not a tall one, so you can safely ignore this preview image).

Step C: Create a Third Style to Choose
- Now we put ImageCache Action's magic to work. Create a new style called 'processed 280x240' or whatever you like.
- For the first action, add 'Aspect Switcher'
- The next screen is pretty self explanatory - you want to choose the appropriate image style for a certain condition. Select the two styles you just created and click the 'Add Effect' button and you're done!
Lastly, choose this last style for your image field in Manage Display for whatever content type is using an image. If you're not getting the exact results you want, tweak the dimension settings as you like. It's not a perfect solution but it is one of the easiest, most straightforward ways of dealing with different aspects put into one. To see the results of this module, check out:
- MaryWinspear - Event Listings
- SunLovers - Testimonials